16/07/20 BLOG 6: MOTIF MAKING
|
Hi! It’s Shannon (CLiCK Resource and Information Officer) here again. Last week, I had a go at Alice’s first masterclass on doodle design. From this masterclass, I was able to come up with a design for one side of my tote bag. This week, I’m going to be designing the other side of my tote bag through some motif making. You can tell us what you think of this masterclass – and share your own doodles and motifs – by getting in touch with us HERE. Last week, I had a go at Alice’s first masterclass which was all about finding your creative flow through doodling. I found it quite difficult to find my flow at first, as I haven’t really done anything artistic since secondary school. But, by the end of the masterclass, I had come up with a design for one side of my tote bag!
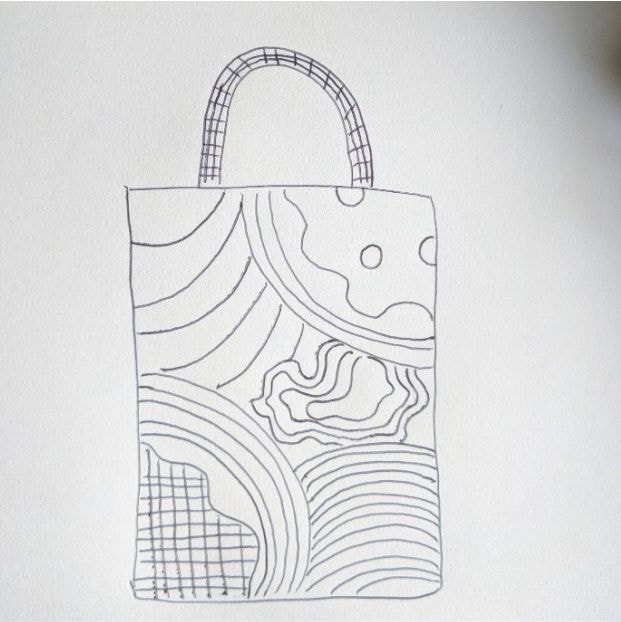
Result of doodle masterclass: Last week, I planned out the design
of one side of my tote bag using doodles. This week, I had a go at designing the other side of my tote bag by following along with Alice’s second masterclass on motif making. Before I show you how I got on, what exactly is motif making? Put simply, a motif is an image or design which is usually repeated to form a pattern. You can think about motifs as being made up of doodles. I always find myself absent-mindedly sketching prisms in the margin of my notepad – so say a prism is my doodle (step 1). I can then repeat that doodle to form a pattern, or motif (step 2). I can then add other doodles to expand my motif (step 3). So, if you can doodle (and really everyone can) then you can make motifs!
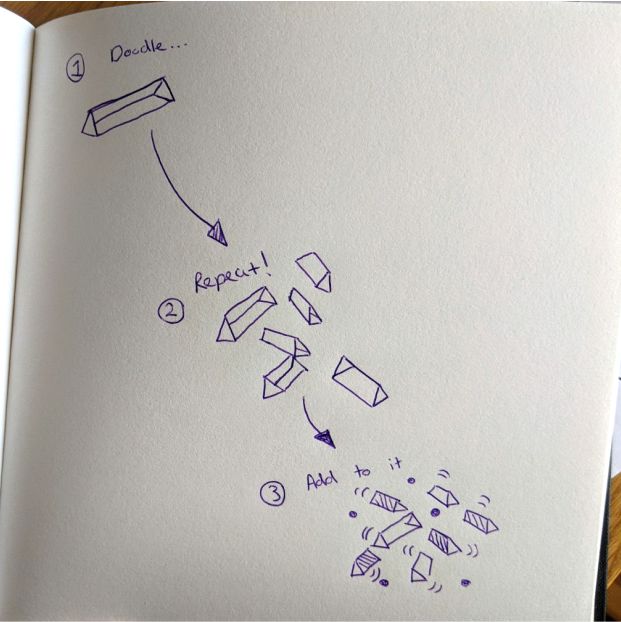
Building a motif: If you can doodle, you can build a motif!
The FIRST STEP of Alice’s motif making masterclass encourages you to find 4-5 items in your home that represent self-care to you. These objects don’t need to make sense to anyone else – all that matters is that they mean something to you. To help you pick out items, you might want to consider the 5 categories of self-care that we have built Together Alone around: grounding, connection, joy, movement, and comfort. I chose 4 items that mean something to me: my exercise band (movement), my favourite mug (comfort), my favourite earrings (joy), and a sunflower (grounding).

Step one: Pick 4-5 objects that represent self-care to you.
These items have all played quite a big part in my day-to-day life during lockdown. I use my exercise band daily for resistance training and stretching – working out is my favourite form of self-care. My favourite mug (which is supposed to be a cactus) was given to me by a friend when I got my first grad job – she had planned on getting me a real cactus for my desk but when she saw this mug she thought it was just so ridiculous that she had to buy it. I love sitting out in my garden and having a cup of tea at the end of the day. I’ve worn these earrings almost every day during lockdown and they help me feel dressed up even if I’m just wearing jeans and a t-shirt – they give me a little confidence boost! I absolutely love sunflowers. I currently have a bunch sitting by my kitchen table, where I’ve been working everyday during lockdown. I love looking over at them when I’m feeling stressed or overwhelmed, just taking a second to breathe and appreciate how vivid they are.
For the SECOND STEP I practiced doodling each item, trying my best to take up as much of the page as possible. I played around with drawing the items from different angles and placements and tried my best to draw the items with one continuous line. The idea of this exercise is to reduce your objects into simpler versions – I think it’s fair to say that I struggled with this idea as some of my doodles are quite detailed. I struggled with the idea of simplicity last week, too. Although I love abstract shapes and patterns, I find it quite hard to reduce complicated ideas or objects down to the abstract level. Even though I’ve found it difficult, learning to embrace simplicity has been a really fun challenge! 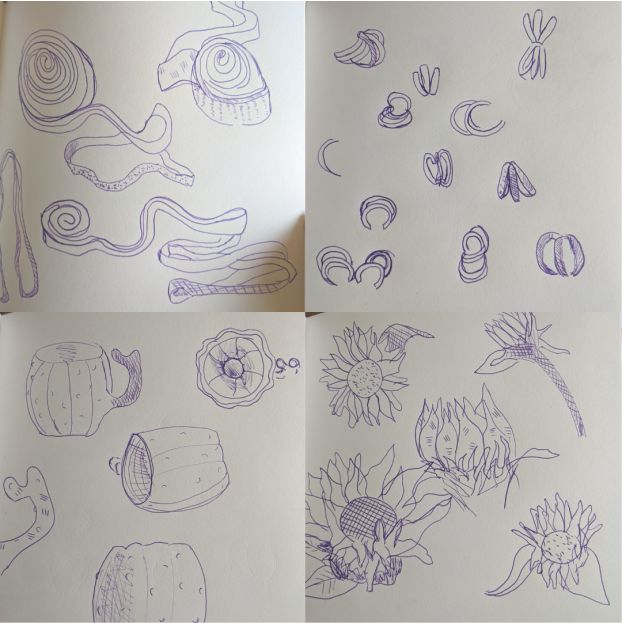
Step two: Doodle your chosen objects, try and take up as much of the page as possible.
|
The THIRD STEP asks you to choose the set of doodles you like the most that relate to just one of the objects. I really liked my sunflower doodles, so I chose to go with those. Next, it was time to start simplifying and abstracting my sunflower doodles…they definitely needed it. In the FOURTH STEP I had a go at drawing a sunflower using only 3 lines. Then, in the FIFTH STEP I had a go at drawing a sunflower using only dots.
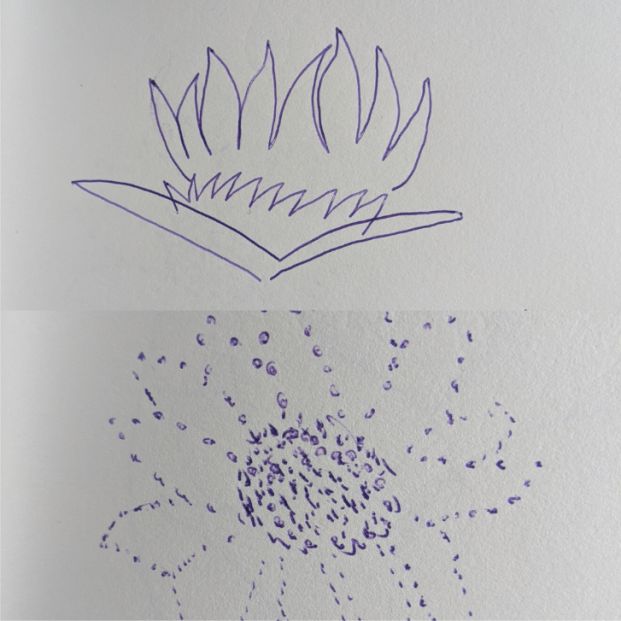
Steps four and five: Try and replicate your favourite doodle using just 3 lines. Try replicating it using only dots.
I think I lost my groove a bit at the SIXTH STEP! Here, you’re asked to draw your object inside a circle and then a square – thinking about how your object takes up space. I think it’s safe to say that I cannot draw a circle or a straight line…
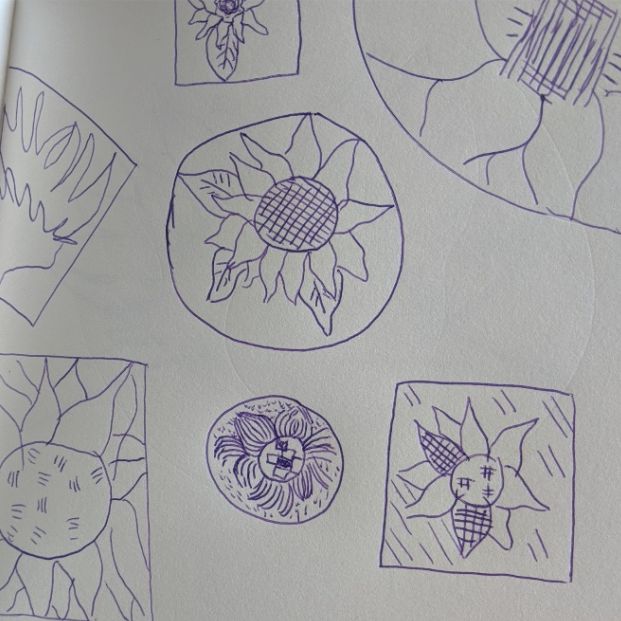
Step six: Draw your object inside circles and squares.
Things picked up a bit in the SEVENTH and EIGHTH STEPS as I created a mirror image of a simplified sunflower and had a go at drawing a sunflower using only two lines. Admittedly, I feel like I cheated a bit in the eighth step as I used two continuous lines and was able to add quite a bit of detail…clearly still struggling to fully embrace simplicity.
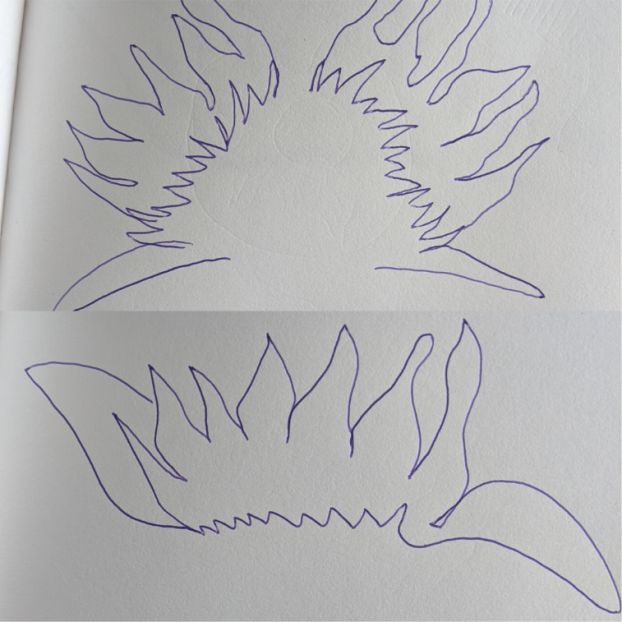
Steps seven and eight: Draw a mirror image of your object. Draw your object using only two lines.
Now, it was time to pick 1-3 of my doodles that I wanted to apply to my final design for the NINTH STEP. I’ve really enjoyed using continuous lines and sketching mirror images during these exercises, so I have chosen to incorporate these ideas into my final design. Below is a sketch of what I’m planning for both sides of my tote bag. The idea is that the sides will be mirror images of each other, with one side being abstract and the other more realistic and natural – but still simplified by using continuous lines.
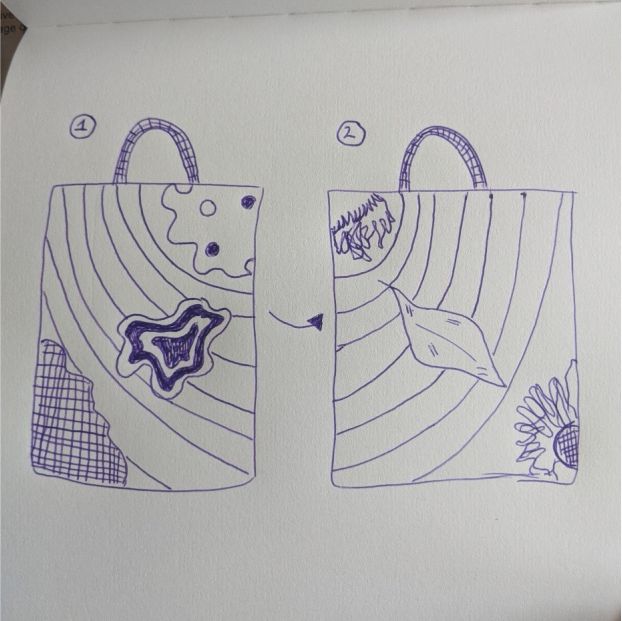
Step nine: Apply your favourite doodles to a final design.
I loved this second masterclass – I feel like I’m starting to find a bit of a creative flow and I really like my idea for my final tote bag! I think it helps if you view the masterclasses as building blocks. Learning how to doodle is the first step, then once you’re comfortable with doodling you can build up motifs with those doodles. Again, I really encourage everyone to give these masterclasses a go! You can see from my doodles and motifs that I’m far from being an artist – but I’m loving this whole process. It’s a bit of dedicated time just for me to put on some chilled music or a funny podcast and just doodle away – it’s really motivating to think that I’m going to have a finished product by the end of it that is completely designed by me.
Be sure to check the blog next week as I’ll finally be transferring my designs over to my blank tote bag using some home printing techniques! See you next week,
|